Showing posts with label bigshot express machine. Show all posts

September 24, 2018

VINTAGE CHRISTMAS SCENE | SIZZIX LIFESTYLE


Hello everyone! I love making this type of cards - artsy, colorful, little vintagy and with touch of  picture book style. I questioned myself why always cars carry Christmas trees, why not mopeds? The idea of Mopeds carrying Christmas tree lead me to make this card. Please check my old video - Car Carrying a Christmas Tree. :)


Products from Sizzix Lifestyle
CARD DETAILS

I started by die-cutting the Moped and Evergreen Bigz Dies out of Canson water color paper with the help of Bigshot Express Machine. Then I water colored the die-cuts with Candid Apple, Vintage Photo and Peeled Paint distress inks. Once the die-cuts were dry, I assembled them with Tacky Glue.


I took Canson water color paper as my base and ink smooshed the background with Broken China Distress Ink. I also added splatters of Broken China and Vintage Photo Distress Inks. I didn't want the paper to soak up all the ink splatters completely so I blotted the excess, this resulted in getting a faint dull background which I was expecting for. Then I sponged some Vintage Photo Distress Ink at the edges of the panel for a defined look.


Then I adhered all the die-cuts over the panel, I tied the tree to the Moped with a twine as if the Moped was carrying the tree. Finally added splatters of white paint for some snowy effect and also added ground to the Moped with the same white paint. Lastly I finished the card with a die-cut sentiment called 'Joy'. 

December 23, 2017

COFFEE STAINED CARD | SIZZIX LIFESTYLE | VIDEO


Recently I've learned how to stain papers. I'm loving that old and vintagy look lately. So I went into my kitchen, brew some Coffee Decoction and stored into a plastic cup. It's easy to apply the decoction to your projects with a paint brush or sponge brush.


Products from Sizzix.co.uk

I applied decoction to the projects and sped up the drying process with a heat it tool. I applied second coat to the songbird die-cut for some rustic look. I actually feel that it looks like wood veneer, right?


Next I adhered the papers with Tacky Glue and popped up the die-cut with foam tape. I stamped the sentiment from Mudra in Versafine Sepia Ink and finished the card with a few golden sequins from Mudra.


And that is the card for today and I hope you like it. I have also made a video for you, Enjoy! :)

December 20, 2017

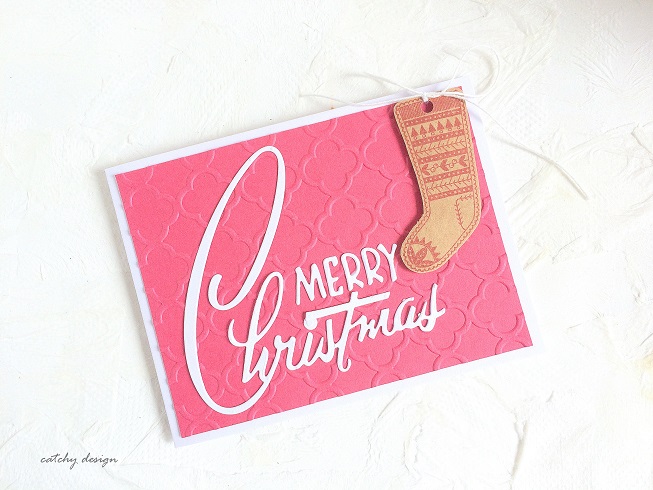
MERRY CHRISTMAS CARD | SIZZIX LIFESTYLE


Hey hi everyone! How are you doing? It's been a while, right! ;) so today I have a very simple yet classy Christmas Card for you!

Products from Sizzix Lifestyle

I ran the Pink card stock and Trellis Embossing folder through the Big Shot Express machine. Look how beautifully it was embossed!! I adhered the pink embossed panel over the main card base with Red sticky tape.


Next, I die-cut the sentiment from Retro Merry Christmas thinlit by Timholtz out of white card stock. The sentiment looks so cool! Love it! I adhered it over the pink card stock with Tacky Glue.


Next I stamped the stocking from Fairisle Stocking on Kraft card stock in Rockin' Red Ink, fussy cut it, punched a hole and tied a bow and foam mounted it over the panel.


And that is it! I hope you like it. Thank you so much for visiting! See you soon :)


Do you remember this competition held in November? The results are out, go check if you are one among them! ;) CLICK HERE

There is also a Christmas Treasure Hunt going on at sizzix.co.uk blog, kindly check HERE.

December 6, 2017

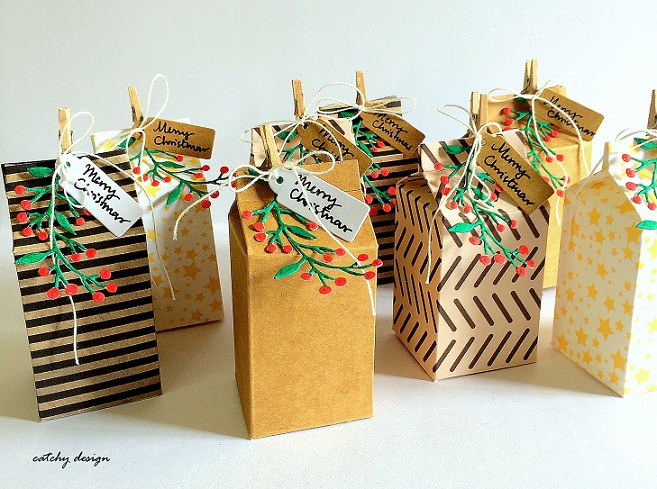
CHRISTMAS THEMED MILK CARTON FAVOUR BOXES | SIZZIX LIFESTYLE


Hello everyone! I hope you are having a wonderful time! I made these Milk Carton Favour Boxes for my neighbor's kids. These are just for sample, may be I'll make more in the next coming days!!! 


I used a few pattern papers from Prima and Mudra. I die-cut the leaves out of white card stock and colored it with Camlin Real Brush Markers!


I die-cut a few smaller tags from out of white and kraft card stocks. The sentiment was handwritten. I also added a bow with white twine and adhered the whole part to the small clothes pin.


I just love how these turned out. They are so so cute! :)


Products from Sizzix Lifestyle

And that's it and I hope you like it. Thank you so much for visiting! :)

December 4, 2017

TRINKET BOX | DIY | SIZZIX LIFESTYLE


Hello hello everyone! I am so happy that we have entered the season of Love, Happiness and Kindness! Today I am here with a DIY project made using almost with scraps from my stash. It's a Trinket Box! I always wanted to make a project like this finally I am here with it. It is not perfect but I like it though! 

Products from Sizzix Lifestyle

PROJECT DETAILS

I started by cutting down the card board pieces and adhered the pattern paper from Papericious. Next I applied a coat of Egyptian Gold Pigment Paint to the edges and rubbed randomly over it.


I adhered a strip as shown above for the easy opening and closing mechanism. It wasn't that good but the over all look of the box is cool.


I die-cut the leaves from Holiday Greens, Garden Greens and Meadow Leaves out of a few scrap papers and applied a coat of gold pigment paint. I adhered all the leaves forming a wreath.


I also die-cut Angel #2 from Papericious, applied Stardust Glitter to it's wings and wrapped golden time to it's body.


I adhered the wreath over the box and followed by Angel. I foam mounted the Angel for some dimension.


Finally I embellished the Angel with a few golden gems. I hope you like it :)

PROMOTION


One of the best things about Christmas is it gives an excuse to make lots of beautiful cards! Sizzix Lifestyle would love to see what Christmas Card Creations you have come up with. So the above cards are the I made so far for Sizzix Lifestyle this year and I've shared my projects HERE. Why don't you share your projects with us? For more details please click HERE. Thank you :)

November 20, 2017

3D CHRISTMAS SCENE | SIZZIX LIFESTYLE | VIDEO


Hi everyone! I hope you are having a wonderful Monday! :P Today I'm going to show how to create a 3D Christmas Scene with Sizzix Lifestyle's dies. I used the gorgeous Woodland thinlit dies and the cute Little Deer Bigz die from Sizzix Lifestyle. I have also a video to share with you, in the video I'll be showing you '3D Christmas Scene and the Dimensional Color Layering'.


CARD PROJECT DETAILS

I started by Ink Smooshing the background with Chipped Sapphire and Black Soot Distress Ink onto a heavy white card stock. You can use any water based inks or markers for this technique.


Next I die-cut the trees out of Iris Card Stock and the deer out of heavy white card stock with the help of Big Shot Express machine.


I tried to achieve some Dimensional Color Layering onto the deer. I used Frayed Burlap, Vintage photo and Black Soot distress ink for this technique. 


First, I went the whole deer with Frayed Burlap, then to the edges and a little inside went with Vintage Photo and onto the edges of the deer with Black Soot Distress Inks


I really like the looks of the deer! So pretty and dimensional!! If possible I will come up with a video on showing only the Dimensional Color Layering. :)


I took a scrap piece of card stock, drew a hill with pencil, cut it and adhered it onto the card front. I also adhered the trees and deer with Tacky glue. To mimic the snow I added splatters of Picket Fence Distress Paint.


I made another card before making the actual one and that one was without snow! Which one you like? the one with the snow or without? I have also made a video for you, I hope you like it, enjoy it and would give it a try! Thank you so much for visiting. Take care and I will see you soon :)

October 17, 2017

Pumpkin | Sizzix Lifestyle | Video


Hello everyone! This is one long due post made for Sizzix Lifestyle. If you follow me you know me that I've fallen in love for Mixed Media. The fun part about this card was 'turning those oval framelit dies into a Pumpkin'.

Sizzix Lifestyle Products

Card Project Details

I started by die-cutting all the dies from Cansan Montval Water Color Paper and water colored them with Distress Inks. Leaves - Festive Berries, Picked Raspberry, Spiced Marmalade and Mustard Seed. Pumpkin - Spiced Marmalade and Festive Berries. Once the die-cuts were dry I applied Vintage Photo Distress Ink along the edges to enhance the details. I also hand drew the stem and colored with Peeled Paint and Vintage Photo Distress Inks.


I ink smooshed the Kraft Card Stock with Vintage Photo and ran it through the Big Shot Machine along with Woodgrain Embossing Folder. I inked up the embossing folder with Vintage Photo and Black Soot Distress Ink for some extra interest. 


Then I adhered all the die-cuts as shown above. To add more depth to the card, I added splashes of white - Picket Fence and gold - Egyptian Gold paints with a paint brush. I also added Star Dust Stickles here and there for the sparkly effect. Finally finished the card with a sentiment and foam mounted the panel over the main card base.


I have filmed a video for you, Enjoy! :)

Foldaway Kit Competition Winners


Are you one of them?? Click here to know more details. :)

September 2, 2017

Mixed Media Project | Graceful Angel | Sizzix Lifestyle


I love not only creating CAS cards but I also love making Mixed Media Projects. When I see the masterpieces created by Mixed Media Artists, my jaw automatically drops down and I feel that 'Man! I should make something like that!' After so many trials and errors (for years I can say) finally I realized that Mixed Media is nothing but adding/incorporating different or several or various elements to your projects in a creative way. Simple, right?


I started my project by ink smooshing the background of a heavy white white card stock in Vintage Photo and Frayed Burlap Distress inks.


I torn a piece of cardboard and applied the mixture of white glue + perfect pearls + glitter + white paint over it.


Next I die-cut Graceful Angel out of white card stock and colored the dress with Festive berries and wings with Black Soot distress ink.


I added some dimension to it's wings by adding foam tape


Then I die-cut Antique Doily out of gold glitter card stock. 


Before adhering all things together, I distressed the edges with a pair of scissors. 


Also torn the edges and curled it with my fingers. Then I added splatters of Picket Fence Distress Paint and I let the panel dry for sometime.


Once everything was dry, I adhered all the elements together along with a sentiment strip. That's it!! I love how this project turned out. Thank you so much for visiting, have fun :)

PROMOTION


ETA 

I would like to enter this card to the following challenges.