Showing posts with label cansan water color paper. Show all posts

September 18, 2018

MERRY CHRISTMAS | SIZZIX LIFESTYLE


Hello my dear crafty friends! How are you all? :)

Today I have a sweet Christmas Card for you. I've used the 'cat' die-cut from Sizzix Halloween Thinlit Die Set many times now and I don't know why I am very fond of it. I'm not a cat person but this cute cat stole my heart. I wanted to use and include it in each and every make I do! Do you have any stamp or die-cut that you like the most? Please let me know in the comment section below! :D

Products from Sizzix Lifestyle


How I made this card
  • I started by die-cutting the Canson Water Color Paper with the cat from Halloween Set, gift and Christmas tree from Festive set and colored them with Distress Inks.
  • Next I placed one of the Oval Framelit die over the card stock and partially die-cut the window.
  • I distress colored the window panel with Dusty Concord Distress Ink. I added splatters of water and white paint for some snowy effect.
  • Inside the window I distressed Worn Lipstick Distress Ink.
  • And adhered all the elements with Tacky Glue.
  • Finally stamped the sentiment and finished the card off. 
And that's all for today. Thank you so much for visiting. Please visit sizzix.co.uk blog to know more details and what's happening and what's new over the blog! ;)

October 17, 2017

Pumpkin | Sizzix Lifestyle | Video


Hello everyone! This is one long due post made for Sizzix Lifestyle. If you follow me you know me that I've fallen in love for Mixed Media. The fun part about this card was 'turning those oval framelit dies into a Pumpkin'.

Sizzix Lifestyle Products

Card Project Details

I started by die-cutting all the dies from Cansan Montval Water Color Paper and water colored them with Distress Inks. Leaves - Festive Berries, Picked Raspberry, Spiced Marmalade and Mustard Seed. Pumpkin - Spiced Marmalade and Festive Berries. Once the die-cuts were dry I applied Vintage Photo Distress Ink along the edges to enhance the details. I also hand drew the stem and colored with Peeled Paint and Vintage Photo Distress Inks.


I ink smooshed the Kraft Card Stock with Vintage Photo and ran it through the Big Shot Machine along with Woodgrain Embossing Folder. I inked up the embossing folder with Vintage Photo and Black Soot Distress Ink for some extra interest. 


Then I adhered all the die-cuts as shown above. To add more depth to the card, I added splashes of white - Picket Fence and gold - Egyptian Gold paints with a paint brush. I also added Star Dust Stickles here and there for the sparkly effect. Finally finished the card with a sentiment and foam mounted the panel over the main card base.


I have filmed a video for you, Enjoy! :)

Foldaway Kit Competition Winners


Are you one of them?? Click here to know more details. :)

September 22, 2017

Costume Parade | A Muse Studio


Hello everyone! Here is yet another cards I made for A Muse Studio Blog as a Guest Designer. The stamp sets I used for my card was Costume Parade and Ghostly Greetings I pencil colored the images with Faber-Castell color pencils


I started by stamping and masking all the images on Canson Water Color paper. Next I water colored the shadows with Black Soot Distress Ink and also applied the same ink to the edges of the card base and finished my card by stamping a sentiment. :) I Love this card so so much! Do you? 

Kindly visit the A Muse Studio Blog to know more details and for a BONUS card <3

August 26, 2017

Sizzix Lifestyle | Little Robin | Video


This Little Robin is one of the cutest dies from Sizzix Lifestyle Chapter 3 release. When I first saw this thinlit I knew that I am going to make a Christmas Card. I thought the Holiday Greens thinlits by Timholtz would match perfectly to Little Robin and yes! they sure did! I really like the bright contrast colors on my projects, it's all depends on my mood! ;)


I started by running Canson Montval Water Color Paper and thinlit dies through the Bigshot Express Machine. Then I water colored the die-cut using Camlin Brush Pens


Then I cut brown card stock exactly the same of the main card base and adhered all the die-cuts as shown above. 


To mimic the snow I added droplets of Picket Fence Distress Paint Dauber


And finished my card by stamping the sentiment in white ink and dusted off with Perfect Pearls.


I have filmed a video, you can watch it here or at my YouTube Channel. Enjoy!

The above card was inspired by one of previous makes!


I have a video for this one also! Enjoy!


Thank you so much for stopping by. See you soon! :)

June 19, 2017

Basic Water Color Supplies for Beginners | How to easily Hand Paint Flowers | Video | Giveaway (closed)

Winner Announcement :

ETA - Thank you so much everyone for your participation and for the beautiful comments. Really appreciate it! I will be soon with another giveaway so stay tuned.. :)

And now the lucky winner who won the above stamp set is

Quillish


Congratulations, Ishani. Kindly write a mail to deeptistephens@gmail.com. Thank you :)


If you are my regular blog reader you know that I love Water Colors and how much I am in love with it. I have a very few water color mediums like Distress Inks, Koi Water Colors, Student water Colors, Water color Markers and Faber Castell Water Color Pencils. Since I am a water color enthusiast I googled and searched best and inexpensive water color supplies for beginners. Yep! I am a beginner too so you'll certainly find a lot of mistakes in today's post. :p

Basic Water Color Supplies for Beginners

(Disclaimer : All opinions are my own. I found these supplies work best for me. If you want to purchase or if you feel other supplies work best for you then that's good! Once again all opinions are my own!!)


CARD MAKING PROCESS

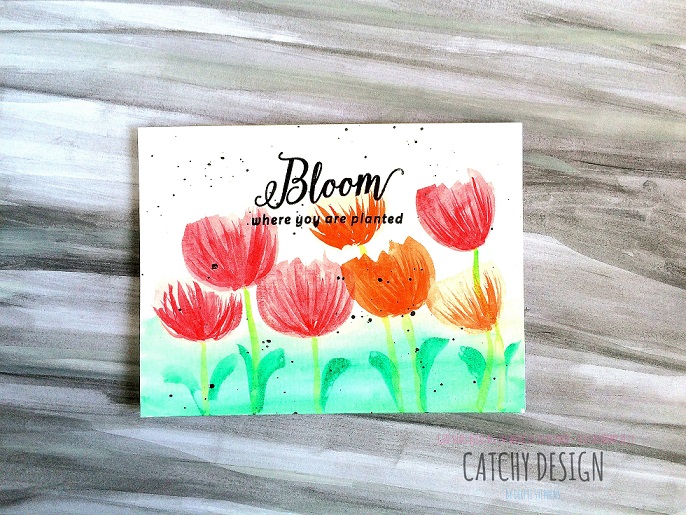
I started by cutting down the water paper exactly to the size of the main card base then I started hand painting the flowers. To paint the solid images I used medium flat brush. 


And for the brisk strokes on the inside of the flower I used a fine tip paint brush.


I then drew the stems and leaves. They are not at all perfect but I liked it :) Later I added a wash of green color at the bottom of the water color panel and muted down the color by adding some water.


I added splatters of black paint and stamped the sentiment from Mudra - Wild Rose in Archival Jet Black Ink. Finally I adhered the panel over the main card base with Red Sticky Tape!

VIDEO TUTORIAL

I have made a video for you showing you the entire process of making this card. I hope you like it :)


GIVEAWAY


I just want to THANK YOU all from the bottom of my heart for showing me such love and encouragement in all the things that I do and I am doing! Enter your name below and I will draw ONE lucky winner on 24th of June, 2017. Thank you :)


April 30, 2017

Mother's Day Card | Pinterest Inspired


Wohoo! Finally I was able to do something that my heart desires. I always wanted to be a water color artist but I don't have or lack the ability to water color. This is not my own design. I saw a few images on Pinterest, loved them, pinned them and just tried one of those images. You can find the inspiration pic HERE  :) The illustration was by Magrikie, you can find their gorgeous work HERE


I used Koi Water Colors to paint images. I kept the inspiration image in front of me and drew the same with a slight changes. It took me less than 20 mins to complete this art work. By the way, the water color paper I used was Canson Montval 300 GSM. 


I added splatters of black paint to enhance the look of the design and finished it off by stamping the sentiments from Mudra. My hubby was standing behind me while I was painting, he was so happy and liked it very much. I am happy too with the result :D 

I will come up with the cards like this in future, making this type of cards is so therapeutic :) May be one day I will come up with my own designs :D