Showing posts with label masking technique.. Show all posts

November 15, 2018

MASKING TECHNIQUE - PART TWO CREATING A GROUP | VIDEO


Hello my dear crafty friends! As promised, I am back with part two video in Masking Technique Series. Click HERE for part one where I've shared a brief introduction to Masking Technique. In today's post I would like to share how to create a group of anything with this technique. Here I have three cards for you, one with video and the other two cards with photos. I hope you like them :)

MASKING TECHNIQUE

PART TWO

CREATING A GROUP


CARD DETAILS


I started by stamping the trees in It's a girl, Melon Ice and Sweet Sixteen Inks, then masked them with a masking paper and stamped again the trees in Mint to be, It's a boy and Bellini Inks.


I used For Everything Stamp set from CP designs and all the inks are also from CP ink collection. Finished the card with splatters of black ink and with a stamped sentiment.


On this card, I stamped the cute mug from For Everything Stamp set in Flirty Fuchsia, masked the mug and stamped the image in Pixie Dust, masked again and stamped in Sweet Sixteen Inks.


All the stamps and inks I used here are from Catherine Pooler Designs. I added splatters of black ink and finished the card with the sentiment.


On a A2 top folding card, I masked off the edges with a thin washi tape and ink blended the background with Carved Pumpkin Distress Ink.


For a dreamy background, I added splatters of water followed by black ink.


While the panel was drying, I stamped the cute fox image from Paper Smooches called Chilly Chums in Memento Tuxedo Black Ink, masked him off and stamped the foxes on either side of the previously stamped fox.


I colored the images with Sizzix Permanent Markers. Before foam mounting the foxes on the card front, I stamped the sentiment from the same set.


And that's all for today. I hope you like it. See you soon with the part three where I'll be sharing how to create a scene with Masking Technique. Take care and I'll see you next time :)

November 9, 2018

MASKING TECHNIQUE - PART ONE SIMPLE MASKING | VIDEO


Hi everyone! Welcome back. Today I would like to discuss about one of my favourite stamping techniques - Masking Technique. This is such a beautiful technique that adds so much depth and dimension to one layer card designs. It creates an illusion that one image is standing  behind the other.


This is going to be a four part video and blog post, here I am with part one where I will be discussing or giving you a brief about 'Simple Masking'. If you are a beginner this video and blog post is for you. For this whole Masking Technique you'll need a masking paper or masking tape or washi tape or post it notes or any thin or copy paper.


Masking Technique

Part One - Simple Masking

In this blog post I will be showing you four ways of Simple Masking. So let's start!

CARD DETAILS

Card #1


For the first card design, I masked off a portion with a broad washi tape and stamped the image. This cute ghost image is from A-muse Studio called Ghostly Greetings. Then I stamped the same image on masking paper and then fussy cut it and adhered over the previously stamped image and blended in Wilted Violet Distress ink.


Then I removed all the washi tape and added splatters of Black Carbon Art Spray by Craftangles. I finished the card with the sentiment from the same stamp set.

Card #2


On the second card, I drew a shape on a piece of masking paper. Then fussy cut it and adhered over the main card panel. And the rest of the card design was similar to the previous card design.


You can customize the design the way you wanted to. Halloween is already over but I wanted to share this cute stuff with you all. I hope that is okay! :) Here I used Black Soot Distress Ink.

Card #3


The third way to mask your card is by using stickers. Any shaped stickers will do the job. 


Here I used Alpha Stickers from Lawn Fawn. You can also mask the background of the card with washi tape or masking tape.

Card #4


After all the cute gloomy cards here comes the most bright, beautiful and colorful card of the day. I ran one of the dies from Perfect Vines Die by Catherine Pooler and masking paper through Sizzix Sidekick Machine.  Then I masked all the edges of the card front with a thin washi tape and then I masked one of the portions of the card with the die-cut. Then I blended in Candied Apple and Carved Pumpkin Distress Inks.


It's always so nice and satisfying to watch removing all the masks off. Then added splatters of black paint and finished the card with the sentiment from Leaf Motifs by Catherine Pooler Designs


I hope you like these cards. See you soon with the part two video where I'll be sharing with you 'how to create a group of anything with Masking Technique. Thank you so much for visiting! :)

July 7, 2018

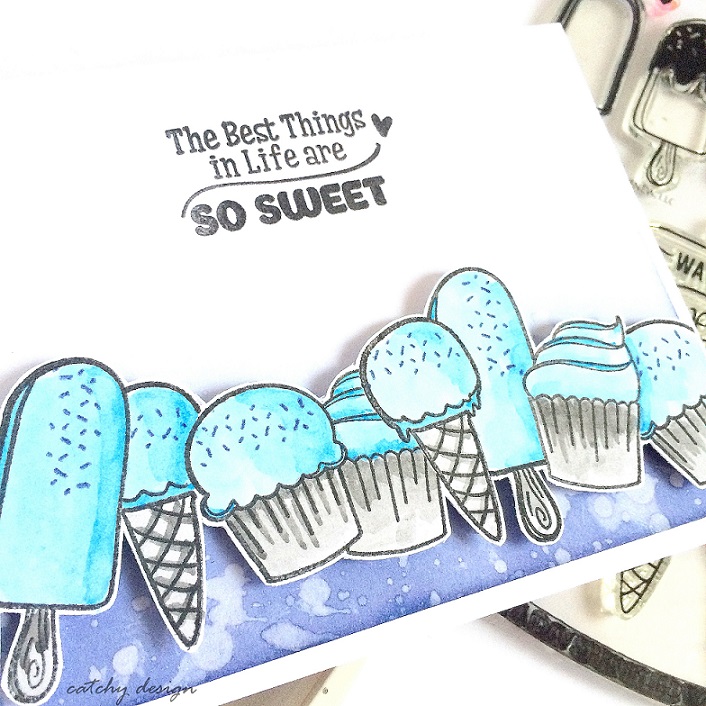
WAY TOO SWEET CARD | ALTENEW


Hello everyone! Masking, Stamping and Water Coloring are my favourite techniques. So today's card is a bit sweet with the three ingredients mentioned above! ;)


HOW I MADE THIS CARD

  • I started by ink blending the lower portion of the smaller panel with Chipped Sapphire Distress Ink.
  • I added splatters of water for some water color look.
  • On another piece of card stock, I stamped the images from Way too Sweet stamp set, masked them and stamped again with Archival Jet Black Ink.
  • Then I water colored all the sweets with Koi Water Colors.
  • Then I fussy cut the panel with a pair of scissors and popped over the ink blended panel.
  • Finally stamped the sentiment from the same set with Archival Jet Black Ink.
  • I stamped the toppings with Chipped Sapphire Distress Ink.

And that's all for today. I'm entering this card for Altenew July 2018 Inspiration Challenge. I hope you liked it. Thanks for visiting! :)

September 22, 2017

Costume Parade | A Muse Studio


Hello everyone! Here is yet another cards I made for A Muse Studio Blog as a Guest Designer. The stamp sets I used for my card was Costume Parade and Ghostly Greetings I pencil colored the images with Faber-Castell color pencils


I started by stamping and masking all the images on Canson Water Color paper. Next I water colored the shadows with Black Soot Distress Ink and also applied the same ink to the edges of the card base and finished my card by stamping a sentiment. :) I Love this card so so much! Do you? 

Kindly visit the A Muse Studio Blog to know more details and for a BONUS card <3

February 12, 2015

Masked Hearts!


Hello friends! Today is the second post for the day... If you wanna see my 'Shaker Card' kindly click here.. Well.. Today I have a simple one layered card with masking and stamping. I used 'Lots of Love' stamp set from Avery Elle. Entering this card to their #21st Challenge, Masking.. 


Hope you like it. Thank you so much for stopping by. See you again!! :)