Showing posts with label sizzix permanent pens. Show all posts

May 2, 2020

ONE LINE ART MOTHER'S DAY CARDS | VIDEO


Hi everyone! Welcome back, I hope you guys are safe and well. Today I have four simple One Line Art Projects for you. These are pinterest inspired, I have few pins for you, please check my Pinterest board for more inspiration. I also have a video for you, kindly watch and have fun :)


I hope you like my projects. Kindly support me by Subscribing to my YouTube channel. Thanks for visiting and I'll see you next time :)

I'm entering this card for Less Is More Challenge #418 - Scribbles, Drips and/or Splats.


February 28, 2020

WITH LOVE CARDS | SIZZIX


Hello everyone! How are you all? Today I have a cute card to share with you and the card features the new die and stamp set from Sizzix called Celebration Phrases Framelits.

CARD MAKING DETAILS


This is the beautiful Celebration Phrases Framelit die set with stamps. The dies and stamps in this set are very cute. 


I started by die-cutting all the images out of white glossy card stock.


Then I colored it with Sizzix Permanent Markers and also stamped the sentiment inside the speech bubble.


I adhered all the images over the card front with tacky glue and foam mounted the speech bubble. I decorated the flowers with some gold enamel gem stones.


And that pretty much finishes the first card. I have also made another card with the same dies but changed the color theme.


To learn how I made the background for this card please click here to watch the video. And that's all for today, I hope you like the cards. Thank you so much for stopping by and I'll see you soon :)

February 14, 2020

HAPPY VALENTINE'S DAY POP UP CARD, SIMPLE AND EASY | VIDEO


Hello everyone! I made a simple and easy pop up Valentine's Day card for you. I was inspired by one of my previous cards, I hope you like them.


The stamps are from Craftangles called Sweet Love and Happy Valentine's Day. I also used the card stock and markers from Sizzix.


VIDEO DETAILS


Kindly watch the video and do leave a comment. I love hearing from you guys. Thanks for stopping by and I'll see you soon :)

January 23, 2020

THANKS A TON CARD | SIZZIX


Hello my dear crafty friends, how are you? I have a very cute card to share with you all. Let's start!

Please visit sizzix.co.uk for more inspiration and education.

This card features


  1. Sizzix Thinlits Die Set 9PK - Free Style Florals
  2. Sizzix Sidekick Starter Kit (White & Gray)
  3. Sizzix Accessory – Permanent Pens, 12PK (Assorted Colours)
CARD MAKING DETAILS


I started by die-cutting one of the dies from Free Style Florals in white card stock with the help of Sizzix Side Kick Machine.


Next I colored the die-cuts with the shades of green markers by Sizzix.


I stamped these cuties in Memento Black ink which is an alcohol friendly ink, and simply colored them with Sizzix markers


I added cheeks with light pink marker


and added highlights with white gel pen.


Then I took another panel which is smaller than the main card base and distressed with Broken China Distress Ink with the help of ink blending tool and foam.


I adhered all the images with Tacky Glue.


And finally stamped the sentiment on a piece of card stock and fussy cut it and adhered over the card front.

A few more shots for you


And that's all for today. I hope you like it. Thank you so much for stopping by today. See you soon! :)

January 13, 2020

BE KIND THIS MOMENT CARD | SIZZIX | PICTORIAL


Hello my dear crafty friends, how are you? :) Today I have very beautiful card to share with you all. This card features
  1. Sizzix Thinlits Die Set 9PK - Free Style Florals
  2. Sizzix Clear Stamps - Everyday Sentiments
  3. Sizzix Accessory – Permanent Pens, 12PK (Assorted Colours)
  4. Sizzix Sidekick Starter Kit (White & Gray)
  5. Sizzix Accessory - Multi-Tool
CARD MAKING DETAILS


I started by die-cutting the beautiful flower and details thinlit dies from Free Style Florals with white card stock by running through the Side Kick Machine.


To add the gredient of color, I colored the flower with Red and Pink permanent pens.


and the details of flower with shades of brown.


Here is the result. I like how the colors blend beautifully,


I chose this beautiful pattern paper to compliment that beautiful flower.


I applied Vintage Photo Distress Ink to the pattern paper. I did a little mess but that's okay. I'll fix the mess and you'll see it the next coming pics.


See! How I covered the mess! 


I did a little stamp surgery with a pair of scissors.


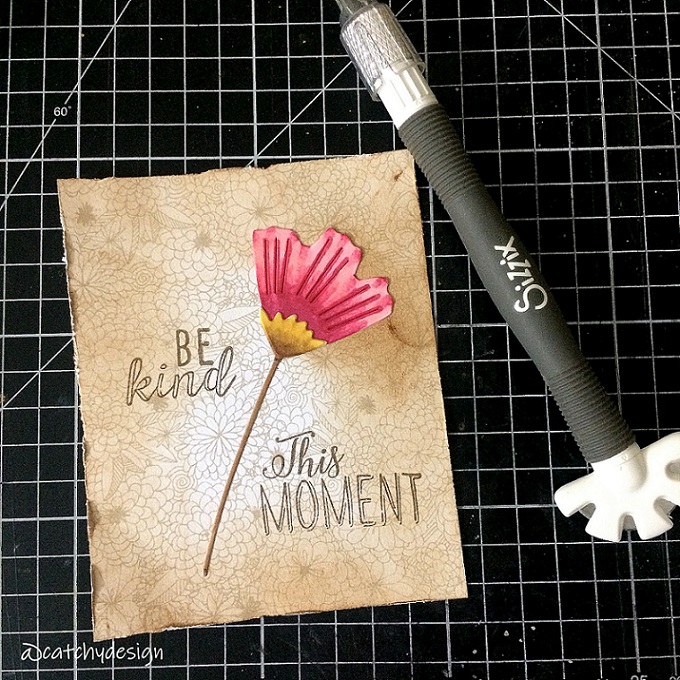
I stamped the sentiments with Versafine Sepia Ink. I like the sentiment, 'Be Kind This Moment' for everyone you meet is fighting a battle you nothing know about.


I distressed the edges with Sizzix Accessory - Multi-Tool.


I added sequins to ehnace the beauty of the card design.


To add shimmer to the flower I added Wink Of Stella clear glitter pen.

A few more shots for you :)


I hope you like the card. Thank you so much for stopping by today. See you soon! :)

February 8, 2019

FUNKY BOUQUET | SIZZIX


Hello hello my dear sweet friends! I have lots of projects to share with you all, I thought of sharing one after since Monday but you know, chores and other responsibilities kept me away from blogging but not from crafting. I always spend sometime for crafting even though I have a busy schedule because that keeps me happy, refreshed and motivated. :)


So this card is for Sizzix and I've used the most beautiful thinlit dies called Funky Festive designed by Tim Holtz. Below are the products (from Sizzix) I used for my card.


CARD DETAILS

I started by die-cutting a few thinlits from Funky Festive out of white card stock through the Sizzix Sidekick Machine. Then I colored the dies with Sizzix Markers. Over the main card base, I masked one of the edges with washi tape and blended in with Broken China Distress Ink and then added splatters of water and removed the excess with a tissue paper.


Then I adhered all the die-cuts over the main card base and embellished with a few clear sequins. For more dreamy background, I added spaltters of black paint and finished the card with a sentiment from Craftangles. I hope you like it. Thanks for stopping by, see you soon :)

February 1, 2019

I JUST LOVE YOU CARD | SIZZIX


I hope I'm back to my routine! Making cards regularly, clicking pictures, editing them and finally blogging! Ah! Being productive is being everything. I didn't break my New Year's resolution, 'never relax and never stop learning'. So there will be no relaxing just always keep on learning and experimenting! :)

So this card shares the newly released products from Sizzix.


CARD DETAILS

Nothing too complicated, I die-cut the girl mouse out of white card stock and colored with Sizzix Markers. Then I stamped the background and placed the mouse as if she is holding an envelope full of love. ;) 

December 19, 2018

MAKING TECHNIQUE PART THREE - CREATING A SCENE


Hello everyone! Today's post is all about creating a scene with Masking Technique. Please click here for part one and part two. This is part three and in this video/blog post I'll show you how to create a scene. I used Lawn Fawn Stamps - Toboggan Together Stamp Set, Distress Inks - Chipped Sapphire, CP inks - Lime Rickey and Melon Ice and Sizzix Permanent Pens. This is one layer card by the way! :D


I have a video for you where I've shared everything in detail. I hope you like it. Thanks for visiting! :)