Showing posts with label catherine pooler stamps. Show all posts

May 12, 2020

CASOLOGY WEEK #368, PLANT


Hello my dear lovely crafty friends, how are you? I hope you're safe, healthy and good. #stayhomestaysafe.

Welcome back to another lovely challenge at CASology where the cue word is 'Plant'. Bloom or grow where you're planted, this was the quote inspired and encouraged me to start my crafty journey with absolutely nothing. Now I'm so thankful to our Lord God for everything that I have now. :)


Our sponsor for this challenge is Stamplorations. Join the challenge, have fun and don't forget to leave some love here and on my fellow DT blogs. Would love to receive a comment from you guys!

MY CARD MAKING DETAILS

It is a one layer card with Overlap Stamping Technique (watch video here). The stamp set and Inks used here are by Catherine Pooler Designs.

(I am a part of their affiliate program. This means that I receive a small commission when products are purchased through links I share here (at no additional cost to you). Kindly support me by clicking through these links when you shop. Thanks so much.)


For me everyday is Mother's Day, I usually don't celebrate only on that day, I celebrate everyday with my beloved mom. Do not be afraid to use bold colors and splatters on one layer card design. I hope you like the card and I hope you guys would join the fun. Thank you so much for visiting and I'll see you next time. :)

I'm entering this card for AAA CAS Game #165 - Up To One Third + optional twist A Repeating Image.

January 7, 2020

CASOLOGY CHALLENGE | REPEAT


Hello everyone! Today is my very first day and this is the first post for CASology Challenge where the cue word is 'Repeat'. I'm so happy that I'm finally a team member of my favourite challenge blog. :D


CARD MAKING DETAILS


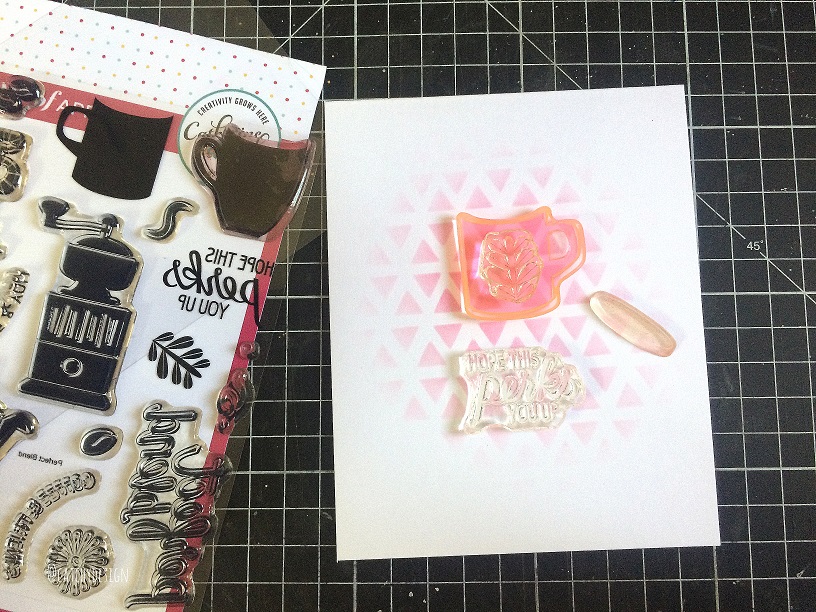
For my today's card I used the Wonky Triangle Stencil and Perfect Blend Stamp Set, It's a Boy Ink, Be Mine Ink and Something Borrowed Ink by Catherine Pooler Designs.


I placed the stencil on a standard sized card base and applied Be Mine Ink through the stencil with the help of an ink blending tool.


I wanted that 'Repeat' pattern only at the centre of the card. Beautiful design is revealed when the stencil is removed.


I took a few stamps from Perfect Blend Stamp Set. This is almost a one layer card. I thought these stamps would do justice to the card design.


I stamped the mug with It's a boy ink then added detail with Something Borrowed ink and the coffee with Versafine Sepia Ink.


I also stamped the sentiment from the same stamp set and fussy cut the images and kept aside.


I added tiny black ink splatters to pull the overall card design.


I foam mounted the images and I watercolored the ground for the mug.

A few shots for you..


And that's all for today. I hope you like it and I hope you guys would take part along the challenges. Have fun dear friends. :)

May 15, 2018

CONGRATS CARDS | CATHERINE POOLER DESIGNS


I have two trendy Congrats Cards featuring the products from catherinepooler.com. These cards are pretty simple to make and yet they look so trendy! I hope you would give them a try!


PRODUCTS USED

(I am a part of their affiliate program. This means that I receive a small commission when products are purchased through links I share here (at no additional cost to you). Kindly support me by clicking through these links when you shop. Thanks so much.)


HOW I MADE THESE CARDS

CARD #1


  • I started by folding the main card base into a top folding card.
  • Then I added splatters of black paint with a paint brush and let the card dry.
  • I stamped the sentiment and fussy cut it with a pair of scissors.
  • I placed a spool golden thread and adhered it over the main card base, then adhered the sentiment as well.
  • Finally I stuck the leaf in the sentiment.
CARD #2

  • I drew the lines with copic marker on a top folded A2 card base.
  • I took another panel and added splatters of black paint.
  • Adhered all the elements with glue.

I hope you like these cards. Thank you so much for visiting! :)

August 3, 2017

What do you do when you are bored?


What do you do when you are bored? Well.. I love making pretty simple things when I am bored like be it a simple stamped pattern, be it a simple doodle or just anything simple! I really enjoy myself being simple. 


Last few days was really gloomy and I really don't have any energy or mojo to do anything creative. We were in grief and was very sad because of the demise of my dad. It's been a year already and I still feel that the incident happened yesterday. I badly badly miss him. Things were alright when he was here :(


Going to cemetery, visiting my dad's grave and his first memorial service all pushed me into great grief and that grief lead me to a kind of depression and that depression lead me to boredom and lack of energy. I do not know how to explain but those who faced and went through all this will definitely understand my situation.


To kill that boredom and get back to my daily routine, I started making cards with simple designs! And also I doodled a little, I will show you the full project in the next post. 


I started by stamping the pattern on white card stocks in Sweet Sixteen and Pixie Dust Inks and Tiara and Tiki Torch Inks. For creating the pattern I used Circle and Floral stamps from The Perfect Reason Stamp Set and sentiment is from You Did It stamp set.


I stapled the sentiment strips for some interest and embellished the cards with sequins. I hope you like the cards, please do not hesitate to do simple things once in a while or when you are bored like me. Making simple things is the best medicine for depression. Keep doing! Good Luck <3

July 24, 2017

Overlap Stamping Technique | Catherine Pooler Designs


Hello everyone! Today I have a very simple, fun and easy stamping technique called Overlap Stamping. Overlap Stamping Technique is nothing but layering of images. This is such a fun and easy technique, you don't need to mask your images at all. You can simply go with the flow! The good thing about this technique is when the colors overlap each other they automatically create another beautiful color. Such a wonderful and stress free technique :)


For my today's project, I used Yay Stripes and Butterfly Notes stamp sets from Catherine Pooler Designs. This Butterfly Notes is a part of Stamp Of Approval Lovely Notes Collection. If you know me, I like using bright and happy colors on my projects but this time I went with pastel shades.


The inks I used - It's a Girl, Sweet Sixteen, Bellini, Melon Ice, Mint To Be and Midnight Inks. All these gorgeous and lovely inks are from Catherine Pooler Designs.


I started by stamping the butterfly on a smaller panel with the inks mentioned above in a random and overlapped manner. I cleaned my stamp with a cloth in each intervals.


I love how the images overlap and creates another beautiful color. Once the stamping part was done I went ahead and added splatters of black paint with a thin paint brush. I love doing this and I strongly believe that these splatters add so much interest to the card!


Onto the main card panel I stamped the striped line from Yay Stripes stamp set in Midnight Ink. Finally I added the smaller panel over the main card base with foam tape. :)


I've also filmed a video for you where I've shared everything in detail. I hope you like it! Thank you so much for visiting. See you soon :)

July 19, 2017

Quick and Easy Christmas Cards with Catherine Pooler Designs


Making quick and simple Christmas Cards is so much fun. If you stick on to one design then it will become a lot more easier for you to mass produce the cards. Here I've followed the same sketch on all my cards but switched the colors in between.


By the way I used the products from SOA - Candy Cane Lane Collection for my projects today. Did you know the collection is available right now at catherinepooler.com ? Such a lovely collection and I encourage you to go check their site and products :)


I used Peppermint Stick Background stamp and Merry & Bright Boughs stamp sets for my cards!


CARD DETAILS

I inked up the Peppermint Background Stamp in Rockin' Red followed by Melon Ice and Aquatini and stamped onto the front of the main card base. As you can see the Melon Ice Panel is slightly brownish in color because the ink got slightly mixed with Rockin' Red. I like it when two colors mix together and give us an unexpected color! :)


I cut the panels smaller than the main card base and stamped the sentiments and images from Merry & Bright Boughs stamp set.


I like the fonts and I liked the over all design of these cards. It looks clean, fresh, modern and trendy. :) I loosely water colored the holly leaves with Lime Rickey Ink. Yes you can absolutely water color the images with these inks. You can check the video HERE.


Finally adhered the panels over the main card base with foam tape. I didn't want to add any embellishments on my cards as I wanted them to be mail friendly :)


And that's it. I hope you liked my cards and I hope you got inspired. Thank you so much for visiting!


May 6, 2017

No Line Water Coloring with Catherine Pooler Inks | Video


Water-coloring is becoming one of my favourite techniques! In my last week's post I mentioned that I wanted to be a water color artist. Since then I just kept trying and I'm not saying that I am pretty perfect at this moment. You can point out many mistakes but I just love the result and I wanna keep trying :)


CARD DETAILS

As soon as I got my inks from Catherine Pooler Designs I almost tried out all the techniques, kind of tested it out and found that these inks are not only juicy and vibrant but also very versatile.
  • When stamped it gives a solid and non splotchy image (ex: here)
  • Gives a perfect ink blended background (here)
  • Great for ink smooshing (here)
  • Can do water coloring also 

I started stamping a few floral images from Beautiful You stamp set on Timholtz water color paper with Antique Linen Distress Ink. I didn't mask any of my images just nested the flowers by turning the images in different angles. I smooshed Flirty Fuchsia, Party Dress, Rockin Red and Lime Rickey inks on a DIY palette and water colored the flowers with a paint brush.


I just love the result. As always I added splatters of black paint to enhance the beauty of the design. I struggled a bit on where the sentiment should go but I decided to stamp on the center of the flower. I outlined the sentiment with Gold Calligraphy Marker to stand against the bright bold background. Finally added Wink of Stella clear for the images.

I have made a video for you and I hope you'll enjoy watching it. :) Thanks for visiting. See you soon!