Showing posts with label big shot express machine. Show all posts

January 1, 2019

HOORAY!! IT'S 2019!! HAPPY NEW YEAR!!


I wish you all a very Happy and Blessed New Year. May God Bless you all :)


In my previous post I said that I'll share my New Year Resolution! so here we go!! I usually don't stick to resolutions so I don't make any! But this year I wanted to make one. When I went through my crafty journey in 2018, there's a couple of things I noticed that I should stick to, not only this year, in the next coming years as well.. So here is mine! And I would badly love to know yours! Please share them with me in the comment section below! :)


The color of the year 2019 by Pantone is Living Coral which is a beautiful shade of pinkish orange or orangish pink. The products I used are from Sizzix Lifestyle and Catherine Pooler Designs.

CARD DETAILS

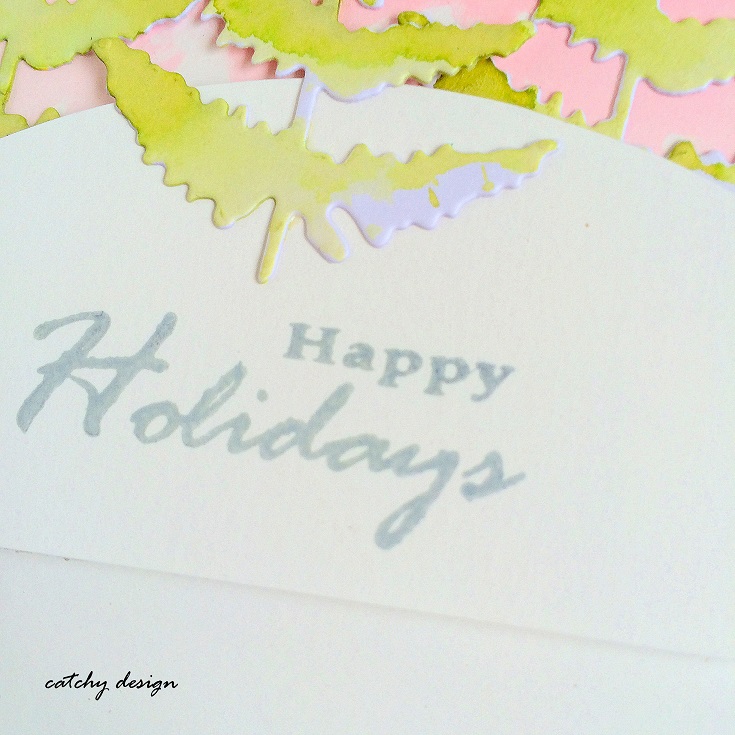
I started by water coloring the white card panel with Pink and Orange Markers to get that Coral shade. The colors I achieved through water coloring was pretty close to that Coral. Then I let that panels dry and ran it through the Big Shot Express Machine along with Flurry #1 thinlit dies designed by Tim Holtz. Later I adhered all the die-cuts over the main card panel which is A2 in size.

 
Next, I die-cut Hooray out of Pink card stock, Tag out of Vellum and 2019 out of left over water colored panel through Sizzix Side Kick Machine and adhered everything with Tacky Glue. I colored the backside portion of the Vellum where the numbers were adhered. I did a little mistake with '2' but I thought that's okay to share with you :D


Finally I adhered a thin gold strip to add more depth to the card design. And that is the card for today, I hope you like it. Thank you so much for visiting. Take care and I'll see you next time! :)

October 22, 2018

BRIGHT FALL LEAVES CARD | SIZZIX LIFESTYLE


Hi everyone! I've been missed in action (MIA) for quite sometime due to some other work. I made this Bright Fall Leaves Card for Sizzix Lifestyle. I used Distress Inks only for the background and for the leaves.

Products from Sizzix Lifestyle


CARD DETAILS


I started by ink blending the background with Chipped Sapphire Distress Ink and added splatters of water then followed by white paint and then gold paint and then followed by Chipped Sapphire Ink. It was such a dreamy background to make!


Then I die-cut Tattered Leaves Dies out of white card stock and colored the leaves with Picked Raspberry, Mustard Seed and Candied Apple Distress Ink. Then added splatters of white paint and gave some details to the leaves with gold paint.


I made a pocket, stamped the sentiment from CP Designs and heat embossed it with Gold Embossing Powder. Also made a simple knot with some white twine. Then foam mounted the pocket over the main card base.


Then struck the leaves into it. And that is the card for today. I hope you like it! Thanks for visiting! :)

November 28, 2017

CHRISTMAS SCENE WITH PATTERN PAPERS | SIZZIX LIFESTYLE


I never made this type of card before and I must say I did experiment with colors and papers. Yep! I used only pattern papers to create the scene. I don't remember the name of those gorgeous pattern papers, they were in my box for almost five years now and finally I got them to use it. I somehow liked this card, not my usual style though, it's a bit grungy and vintagy. :) 

The card design was inspired by one of my previous Christmas cards made for Sizzix Lifestyle. You can WATCH THE VIDEO HERE.

Products from Sizzix Lifestyle
I got the idea of adhering the Treetop Glisten die from Anna Drai, a fellow blogger for Sizzix Lifestyle. She is amazing and you must definitely go and check her blog and YouTube Channel.


Card Making Details

I started by running the pattern paper through the Big Shot Express machine along with one of the dies from Mixed Media #3. And adhered the green pattern paper behind the die-cut panel. I also die-cut the trees and distressed the edges with Vintage Photo Distress Ink.


Next I adhered the Treetop Glisten thinlit die over the trees, die-cut out of gold glitter card stock. And I think this die brings the fullness to the Oh, Christmas tree bigz die


Next I applied the Texture Paste from Ranger as snow. I liked the result so much :) And adhered all the elements with Tacky Glue. Finally I added splashes of Picket Fence Distress Paint and embellished my card with sequins from Mudra.


And that is the card for today. Thank you so much for visiting and I hope you liked it! See you soon :)

November 17, 2017

SIMPLE CHRISTMAS POP UP CARD | SIZZIX LIFESTYLE | VIDEO


Hello everyone! Today I have a very Simple Christmas Pop Up Card to share with you all. I was inspired by Amanda from Little Crafty Pill for the pop up thing. She took measurements but I didn't as I don't like taking measurements and all. I just want to live that way! Thank you Amanda for all the helpful tips and tricks you share in your videos :)

The Tree Line was the previous release and the Village Christmas Time Die is from the latest collection by Tim Holtz for Sizzix Lifestyle. 


Card Project Details

I'm loving working on Kraft Card Stock lately so I took a standard sized card base and another panel smaller than the main card base. Then I ran all the thinlit dies through the Big Shot Express machine and die-cut the pieces out of Black card stock.


I double stacked the Village Christmas Time die. Next I adhered the Tree Line die onto the smaller panel with the help of Tacky Glue. I added splashes of Picket Fence Paint to mimic the snow. And I let the panel dry completely.

Next I made the pop up thing, you can watch it in the video below. I adhered the Santa and Reindeer's die to the pop up element with the help of glue. Finally stamped the sentiments both inside and out with CP's Midnight Ink.


I hope you like it and would give this a try. I have also a video for you. Thank you so much for visiting. Just Watch and Enjoy! :)

November 10, 2017

PINKY HOLIDAY CARD | SIZZIX LIFESTYLE


Do you like making Holiday Cards with non traditional colors and supplies? I enjoy doing it and I do it every year, I love playing that way! :)

Products from Sizzix Lifestyle

please visit sizzix.co.uk for more information and education about die-cutting and handmade products.

CARD PROJECT DETAILS

I like Iris card stock for some reasons because it is smooth, gives good results with the ink blending also gives a whimsical look when water or water colors were applied. When you stamp an image it does take a few seconds to dry but I think that is not a problem at all! Overall the finished card looks fantastic!! So I started by trimming down the Iris card stock to a standard sized side folding card, took another panel smaller than the main card base.


Over the smaller panel I ink blended the background with Worn Lipstick Distress Oxide Ink. After that I added splashes of water and blotted the excess water with a tissue paper. Once that's done I placed Bubble Stencil from TimHoltz's Stampers Anonymous, applied Picket Fence Dauber Ink through it.


Next, I die-cut one of the Meadow Leaves through the Big Shot Express Machine and water colored it with Peeled Paint Distress Ink.


I free hand cut the hill with a pair of scissors and adhered the hill top over the smaller panel with foam tape followed by the leaves/trees with Tombow Glue.


Finally stamped the sentiment 'Happy Holidays' in London Fog ink by Memento


Also adhered the smaller panel over the main card base with foam tape. And that finished my card for today. Thank you for visiting. :)

October 20, 2017

Haunted House | Unboxing Chapter 4 dies | Sizzix Lifestyle | Video


Does this Haunted House look scary? I think it's kinda cute! :) This spooky thinlit die is by Tim Holtz's Halloween Collection called Haunted House. I have two more spooky cards on my blog made using Tim's collection, you can check them HERE and HERE.


Card Project Details

I started by die-cutting the Haunted House die out of Black Card Stock by running through the Big Shot Express machine. Along with that I also die-cut the Moon out of yellow and Bats out of black card stocks


I placed the yellow card stock behind the windows and doors of the haunted house just to mimic the lights were on in the house.


Do you like what I did to the sky? To add more spookiness to the background, I dabbed Picket Fence Distress paint over the main black card base and smudged the paint with my fingers. That created an interesting sky! :)


Next, I adhered the house, moon and the bats with foam and glue. I added black wink of stella to the bats and clear wink of the stella to the windows and doors.


Finally I wrapped a white twine and finished the card with a sentiment strip. That sentiment was from A Muse Studio.


Here I have created a video for you showcasing the Chapter 4 goodies, Latest Halloween Dies by Timholtz and the card I made I using Haunted House Die. Enjoy! :)


CHAPTER 4 DIES
Tim Holtz's Halloween Dies

September 26, 2017

Trick or Treat | Sizzix Lifestyle


Hello everyone! I am into a kind of Mixed Media and Vintagy mode lately and I don't know why! ? Anything grungy is attracting me. I am dreaming of those colors. May be, I guess that's the spirit of Halloween! LOL! So I am here with a kind of grungy card made for Sizzix Lifestyle with the brand new Halloween dies collection by TimHoltz called Trick or Treat.


Project Details

I started my card design by ink blending the Canson Montval Water Color Paper with Antique Linen and Frayed Burlap Distress Ink and added splatters of water for some awesome look. Next I die-cut all the images from Trick or Treat set through Big Shot Express Machine.


I used Brown, Orange and Black colored cardstocks for my die-cuts and adhered them over the card panel. Once I am happy with the placement I applied Star Dust Stickles here and there onto the die-cut images.


Finally I adhered the card panel over the main card base. This is not an A2 card, it's a kind of long top folding card ;)

Big Shot Express Machine 
Trick or Treat
PROMOTIONS

Be Inspired Halloween


You can download these beautiful spooky Halloween papers for free HERE

It's Competition Time


Have you seen brand new Big Shot™ Foldaway Machine! Sizzix Lifestyle is offering you one of three chances to win and every Foldaway machine comes with free bonus content, meaning you can start making right out of the box; including Papers, Fabric, Felt, a selction of Thinlits™ dies and a Bigz™ die! There is still time to participate,you can enter your name HERE

September 18, 2017

Witchcraft | Mixed Media | Sizzix Lifestyle


Hello friends! Here is my second proper Mixed Media project made for Sizzix Lifestyle. I used the brand new thinlit dies called Witchcraft and Trick or Treat by Timholtz. This card was inspired by my previous card, you can check it HERE.


PROJECT DETAILS

I started by ink smooshing the background with Chipped Sapphire and Black Soot Distress Inks. This card is not  a regular A2 sized card, it's a little bigger and square in shape.


I took a corrugated paper and ran all the dies through the Bigshot Express Machine.(You can find all the dies I used at the bottom of the post)


Next I added some texture to the Witch by applying some glue and pouring on Ranger Glitter. Also applied some gold and black paint to it.


I did the same thing for the cat also. Look how spooky they are! 


Once everything was dry I adhered one of the die-cuts from Mixed Media #3 by Timholtz onto the ink smooshed panel, the die-cut was cut out of gold glitter card stock. I adhered the Witch and Cat as well onto the panel.


Next, I die-cut the sentiment from Trick or Treat thinlit dies and applied the same formula as I did for the other die-cuts.


And then I die-cut the stars from Witchcraft thinlit dies and adhered over the card panel. I like how this card turned out, it took me more than an hour to complete! :)


And that is the card for today and I hope you liked it. I am entering this card for Simon Says Stamp Monday Challenge - It’s Written In The Stars. Thank you so much for visiting :)