June 6, 2018

SIZZIX FLORAL BANNER THINLIT DIES BY SIZZIX LIFESTYLE


Hello everyone! Today I have another card using Sizzix Floral Banner Thinlit Die by Sizzix Lifestyle. Recently I realized one thing about me i.e., I'm clean and simple but I also love creating funky and beautiful backgrounds. So, I asked one of my good friends to define my style and the reply was 'versatile'. Yep! I'm versatile! LOL! :)

PRODUCTS FROM SIZZIX LIFESTYLE


HOW I COLORED THE BUTTERFLY DIE-CUTS

  • I started by water coloring the heavy weight white panels in gold and several colors.
  • Then I placed the Butterfly thinlit dies from Floral Banners which is dual layered and die-cut the layers by running through the Big Shot Plus Machine.
  • Then I adhered the layers of the butterfly with glue.
  • To embellish more, I adhered sequins in the middle of the butterflies.


HOW I ASSEMBLED THE CARD
  • On a black card stock, I splattered some black paint.
  • Adhered the butterflies over it.
  • And finished the card with a sentiment strip from Hero Arts.


A FEW MORE SHOTS FOR YOU


I hope you like the card. Thank you so much for visiting! :)

June 4, 2018

CARDS WITH SIZZIX FLORAL BANNER THINLIT DIES


Pinterest is the place where I usually hang out a lot for my inspiration. Ever since I saw the beautiful Floral Invitations, I yearned for some floral cards like these. Finally, I was able to make a few of them! These cards feature Sizzix Floral Banner Thinlit Dies by Sizzix Lifestyle.

PRODUCTS FROM SIZZIX LIFESTYLE


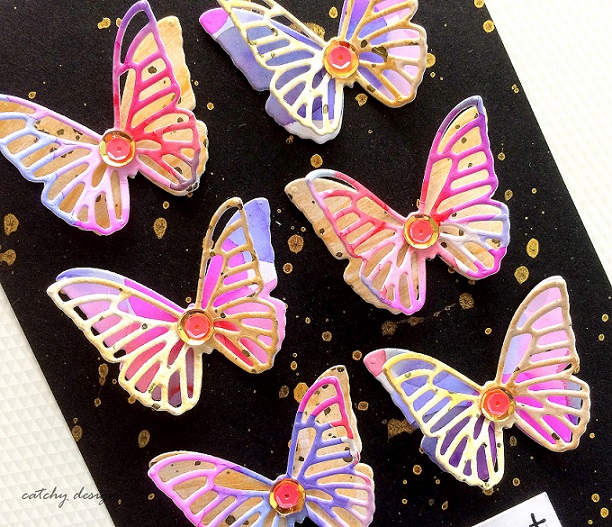
HOW I COLORED THE DIE-CUTS

  • I started by water coloring the heavy weight card stock with Camlin Brush Pens.
  • Once the card stock is dry, I placed all the floral thinlit dies from Sizzix Floral Banner Thinlit Dies and ran it through the Big Shot Plus Machine.
  • The result was beautiful flowers and leaves in unexpected colors. That's the beauty of water coloring.
  • I needed a touch of gold, so I went ahead and added gold spots in the center of the flowers and leaves.
A FEW MORE SHOTS FOR YOU


I arranged a floral frame and finished the card with a sentiment from Hero Arts - Best Wishes.


I arranged the flowers at the lower portion of the card and finished the card with the same sentiment from Hero Arts.


I tried a little water coloring in a dripping fashion on this card. I arranged the florals at an edge on the top portion of the card.


And that's all for today. I hope you like my cards. I'm entering these cards for A Blog Named Hero Water Color Challenge. Thank you! :)

June 3, 2018

SWEET MASCULINE CARD | HERO ARTS


Aww! I need a blanket like this one!! or at least a pillow case? or a wall frame? May be I can go for a wall frame! I just love how this one turned out. I strongly have a desire to make something for myself with this design and colors!:D


HOW I MADE THIS CARD
  • I started by stamping the images from Hero Arts - Baby Animals on Canson Water Color paper with Archival Jet Black Ink.
  • I water colored all the cuties and the background with Camlin Brush Pens in bold and sweet masculine colors.
  • I added details to their shirts with black marker.
  • I also stamped the sentiment from Hero Arts - Everyday Sayings on a strip of white card stock and adhered over the main card base.
A FEW MORE SHOTS FOR YOU


FOR CHALLENGES


I hope you like it. Thanks for stopping by! See you soon :)


June 1, 2018

TROPICAL CARDS | SIZZIX LIFESTYLE


I'm in love with these tropical colors and beautifully embossed tropical backgrounds made using with Sizzix Textured Impressions Embossing Folder - Tropical Leaf! Ink Smooshing technique was used to create these beautiful watercolor backgrounds. You can check the video HERE for creating the backgrounds like this with Camlin Brush Pens.

PRODUCTS FROM SIZZIX LIFESTYLE


HOW I MADE THESE CARDS
  • I started by ink smooshing and water coloring the backgrounds of my cards with Camlin Brush Pens.
  • Once the cards was dry, I went ahead and embossing all of them with Sizzix Textured Impressions Embossing Folder - Tropical Leaf and Big Shot Plus Machine.
  • Applying white paint on the embossed layers of Yellow card and gold paint on Pink Card created some depth in the cards.
  • Lastly, I adhered the sentiments from Hero Arts - Best Wishes stamp set and embellished the cards with sequins.
  • I also rounded the edges of the cards for some soft finished look.


Did you check this beautiful, beautiful papers at Tropical Hub. Summer is here, get creative with these free papers! :)

FOR CHALLENGES

Thank you so much for visiting! :)

SQUIGGLY DOODLING


Hello my dear friends! I'm a very fond of doodling. In my spare time or the times when I am depressed or stressed out I doodle a lot. I blabbered a lot about doodling HERE in the blog post. And also you can find 100% handmade cards HERE and HERE. Do check it out, it's fun!


I hand drew all the images on a white card stock, colored them with Copic Markers, fussy cut and adhered over the main card base. To the card base, I added stripes with the Copic Marker and added tiny black dots with a black permanent marker. :)


Do you like my squiggly art? I'm entering this card for CASology Week 302: SQUIGGLE, CAS-ual Fridays CFC #200 - Birthday Celebration, AAAcards CAS Game #116 - The 4th Big Birthday Bash and SSS Wednesday Challenge - Anything Goes.