October 30, 2017

Foamiran Flowers | Sizzix Lifestyle | Pictorial


Hello everyone! Today I have a very fun and interesting project to share with you all - Foamiran Flowers. To be honest I am very new to this type of crafts, this is the first time I've ever tried and I am pretty sure you'll love making these as much as I do. 

I used the following Bigz Dies to make my Foamiran Flowers..


You'll need the following products to make this craft
  • Foam Sheets
  • Hot Glue Gun
  • Iron Box or Heat Tool
  • Skewer or a Pencil
  • Inks (optional)
  • Glitter (optional)
Procedure of making Foamiran Flowers


Start by die-cutting the foam through the Big Shot Plus Machine


Once all your die-cuts are ready, apply ink/chalks to the edges of the foam flowers. In my case I used Chalk Colors to color the edges.


Put your settings to silk in your Iron Box and apply heat as shown above. Use a skewer or a pencil to protect your fingers from burning.


As soon as the heat was applied, twist the flowers nicely and keep it aside


Then open the petals slowly and carefully and adhered the petals with Hot Glue Gun. They turned out pretty, right?


I also applied Star Dust Stickles to the edges of the petal and smudged it with my fingers. 


To enhance the beauty of these flowers I adhered golden beads with glue


I turned one of the petals from the Asian Flower as green Cactus


Here is another one!


And these are the beautiful roses from 3D Rose Bigz Die


And that is the project for today! I hope you liked it and got inspired. This is such a easy and fun filled craft and I hope you would give this a try. Thanks for visiting! See you soon :)

October 28, 2017

Rainbow Background | Cherrylana Designs


Who doesn't love Rainbows? So I am here with a card with Rainbow colors. I wanted to highlight the background so I kept the remaining parts of my card pretty simple :) This card was up on Cherrylana Designs Blog.


CARD PROJECT DETAILS

I started by masking the horizontal lines on my card front with washi tape. Then I blend in the colors through the masked areas with a ink blending tool and foam.


I used Festive Berries, Spiced Marmalade, Mustard Seed, Peacock Feathers, Broken China and Dusty Concord Distress Inks for my project. A few colors look similar here but in real life all the colors are different from one another.


Next I stamped the beautiful floral image from Magnolia on a piece of white card stock with Archival Jet Black Ink.


I didn't color the image as I wanted the background to pop. I Fussy cut the image leaving a white border and foam mounted it onto the card front. Also stamped the sentiment from the same stamp set with the same black ink.


Finally I adhered a black strip along the edge of the card base and foam mounted it onto the main card base. Also embellished the card with different sized clear drops from Cherrylana designs.


And that is the card for today. I hope you like it and got inspired. Thank you so much for visiting. See you soon :)

October 27, 2017

Three Simple Cards for Mudra Craft Stamps


Hello! My post is up on Mudra Craft Stamps Blog. Kindly visit the blog to know more details. For my cards I used the beautiful Carnation Stamp Set from Mudra. 

October 25, 2017

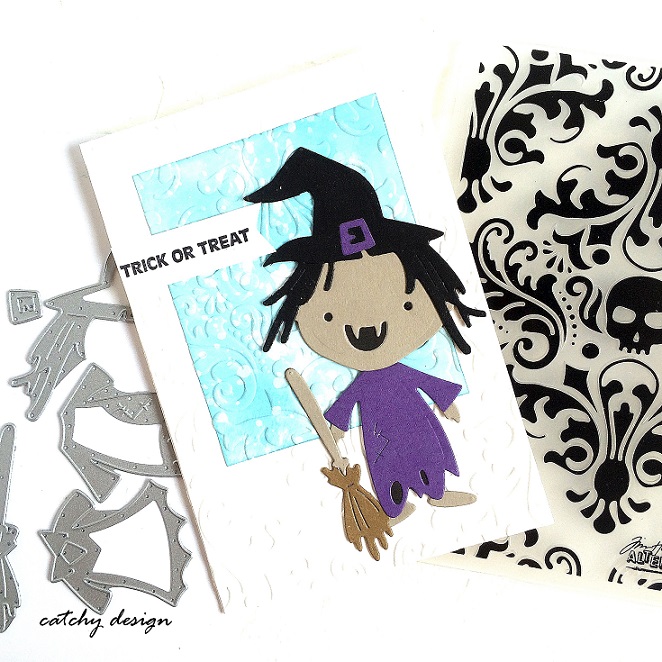
Cute Vampire and Witch | Sizzix Lifestyle


Hello everyone! Making these cute little Vampire and Witch was so easy and fun. These cute little fellows are from Sizzix Lifestyle - Spooky


CARD PROJECT DETAILS

I took an Iris card stock, trimmed into standard sized cards and folded to two top folding cards. Then I cut another card panel exactly to the size of the main card base.


I ran the card panel through the Big Shot Express Machine along with Tim Holtz's Skull Damask Embossing folder. Look at that impression! So pretty!


Then I took another panel, a smaller one, colored it with Festive Berries Distress Ink and added splashes of water for some cool effect.


Next I die-cut the cute Vampire out of brown (body), black (gown and hair) and red card stocks (bow) and adhered with Tombow glue.


Finally adhered the embossed panel over the main card base with glue and foam mounted the red panel over the embossed panel. 


Also adhered the Vampire with foam tape and adhered the sentiment strip over the red panel. By the way the sentiment was from A Muse Studio.


I have also created another card, the design was same but with slight changes. Here, I inked up the smaller panel with Broken China Distress Ink and adhered over the main card base. 


Then I ran the main card base and the smaller panel through the Big Shot Express Machine with the Skull Damask embossing folder. Next I die-cut the cute little Witch and her broom with grey, purple, brown and black card stocks and adhered onto the main card base.


Also adhered the sentiment strip over the embossed panel. 


And those were the cards for today and I hope you like it. :)

October 20, 2017

Haunted House | Unboxing Chapter 4 dies | Sizzix Lifestyle | Video


Does this Haunted House look scary? I think it's kinda cute! :) This spooky thinlit die is by Tim Holtz's Halloween Collection called Haunted House. I have two more spooky cards on my blog made using Tim's collection, you can check them HERE and HERE.


Card Project Details

I started by die-cutting the Haunted House die out of Black Card Stock by running through the Big Shot Express machine. Along with that I also die-cut the Moon out of yellow and Bats out of black card stocks


I placed the yellow card stock behind the windows and doors of the haunted house just to mimic the lights were on in the house.


Do you like what I did to the sky? To add more spookiness to the background, I dabbed Picket Fence Distress paint over the main black card base and smudged the paint with my fingers. That created an interesting sky! :)


Next, I adhered the house, moon and the bats with foam and glue. I added black wink of stella to the bats and clear wink of the stella to the windows and doors.


Finally I wrapped a white twine and finished the card with a sentiment strip. That sentiment was from A Muse Studio.


Here I have created a video for you showcasing the Chapter 4 goodies, Latest Halloween Dies by Timholtz and the card I made I using Haunted House Die. Enjoy! :)


CHAPTER 4 DIES
Tim Holtz's Halloween Dies

October 19, 2017

Thankful Card | Cherrylana Designs


Hello! This card was featured up on Cherrylana Designs Blog. I did want to experiment water coloring on Kraft card stock for a very long time and finally I was able to do that. I was very much happy with the result because the card turned out the way I wanted!


Card Project Details

I started by stamping the floral cluster image from Thankful Stamp set from Cherrylana with Archival Jet Black ink on a medium sized Kraft card stock. This Kraft card stock is by A Muse Studio. I love all the texture going on through it. I water colored all the images with Faber Castell Water Color Pencils.


Once I am happy with the coloring I stamped the sentiment at the bottom edge of my card with the same black ink. By the way the sentiment was also from the same Thankful set.


Later I added some droplets of white paint - Picket Fence Distress dauber with a paint brush over the kraft card stock and adhered the kraft panel over the main card base. :)

October 17, 2017

Pumpkin | Sizzix Lifestyle | Video


Hello everyone! This is one long due post made for Sizzix Lifestyle. If you follow me you know me that I've fallen in love for Mixed Media. The fun part about this card was 'turning those oval framelit dies into a Pumpkin'.

Sizzix Lifestyle Products

Card Project Details

I started by die-cutting all the dies from Cansan Montval Water Color Paper and water colored them with Distress Inks. Leaves - Festive Berries, Picked Raspberry, Spiced Marmalade and Mustard Seed. Pumpkin - Spiced Marmalade and Festive Berries. Once the die-cuts were dry I applied Vintage Photo Distress Ink along the edges to enhance the details. I also hand drew the stem and colored with Peeled Paint and Vintage Photo Distress Inks.


I ink smooshed the Kraft Card Stock with Vintage Photo and ran it through the Big Shot Machine along with Woodgrain Embossing Folder. I inked up the embossing folder with Vintage Photo and Black Soot Distress Ink for some extra interest. 


Then I adhered all the die-cuts as shown above. To add more depth to the card, I added splashes of white - Picket Fence and gold - Egyptian Gold paints with a paint brush. I also added Star Dust Stickles here and there for the sparkly effect. Finally finished the card with a sentiment and foam mounted the panel over the main card base.


I have filmed a video for you, Enjoy! :)

Foldaway Kit Competition Winners


Are you one of them?? Click here to know more details. :)