May 31, 2017

Stay Magical


I'm back to my daily routine - designing, card making, blogging, making videos, editing and etc. It's so happy to be finally in my work station. I have been missing in action but finally I am back. And just to get my mojo back I have chosen one of my older cards as inspiration and created this card. To be honest I wasn't in the mood of coloring and I don't want to color them either so I kept the castles as is. :)


CARD DETAILS

I started by ink blending the background with Cracked Pistachio Distress Oxide Ink and added splatters of water. This created a beautiful oxidized effect to the background.


Next I stamped all the castles from Mudra's Stay Magical set with Archival Jet Black Ink, fussy cut them and adhered them onto the ink blended card panel.


Just to achieve that dimensional look, I used foam tape for the front images. Before adhering the images I stamped the sentiment from the same set with Archival Jet Black Ink.


And for some shimmer I applied a nice coat of Wink of Stella clear glitter and finished it off with a few clear sequins from Mudra.


I hope you like it. Thanks for stopping by. Take care and I will see you next time :)

May 25, 2017

Vintage Watercolor Thanks | Honey Bee Stamps


Hello! Today I'm here with a Vintage Watercolor Card made using Honey Bee Stamps. I used Repeat Pattern Stamping for my card and it is a one layer one too! :)


CARD DETAILS

I started by stamping the flowers repeatedly from Hello Gorgeous stamp set with Versafine Sepia ink. Next I water colored the flowers with Sakura Koi Water Colors. Later I added tiny drops of black paint.


Next stamped the sentiments from Hello Gorgeous and Happiness Stamp set in CP Midnight ink. Lastly I applied the same Versafine Sepia ink to the edges of the card for some vintagy effect.

I am entering this card for ABNH where the theme is 'water coloring'


Thank you for stopping by :)

May 19, 2017

Make a wish | Sizzix | Video


Hello everyone! I love turning pins into cards. If you follow me on Pinterest, you might have seen this 'pin' already. That was such a wonderful pin, the moment I saw the image I wanted to turn it into a card. I don't know what took me so long!!! I have a tiny playlist on my YouTube Channel called Let's Get Pinspired where I turned a few pins into cards  :)


CARD DETAILS

I started by ink blending the panel with Black Soot Distress Ink and added splatters of water for some texture. Next I die-cut the Alliums flower - Make a wish thinlit - out of white card stock and colored the upper part with Dusty Concord and the stem part with Peeled Paint. I die-cut the floral part twice and adhered it on top of the base flower for some dimension.


Next I stamped the sentiment from Stampers Anonymous in CP Midnight Ink. I LOVE that sentiment! I adhered the flower next to the sentiment. I applied a nice coat of Wink of stella clear to the flowers for some shimmer.


Finally finished the card off with a few sequins from Mudra. I have filmed a video for you where I've shared everything in detail. I hope you'll like it :)


I'm entering this card for Simon Says Wednesday Challenge - A Bit of Sparkle

May 15, 2017

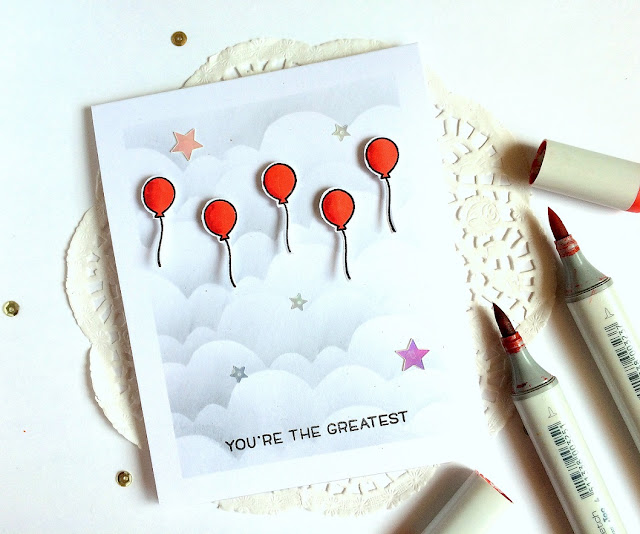
You are the greatest | Lawn Fawn


Hi everyone! I have been away from my work station for a week! Can you believe that! Me staying away from crafting!! LOL!! I've been with my family and spending quality time with them. But today I took some time to craft and made this card for Lawn Fawnatics Challenge 4 – Black, White and Bright. 


This card was inspired by one of my previous cards - HERE and you can find how I made those lovely clouds - Video HERE.


I sponged the clouds with Black Soot Distress Ink. Stamped the balloons from Year Four with CP Midnight Ink. Colored the balloons with Prawn Red | R24 and Lipstick Red | R29 Copic Markers.


Then stamped the sentiment from Pizza My Heart and adhere balloons and sequins. I hope you like it. Thanks for visiting :)

May 9, 2017

Super Sweet News


I really have a super sweet news to share with you all. I have been selected as a DT member for Cherrylana designs. When I first saw their stamps, I was like, OMG! How gorgeous are these stamps! Right away I applied for their DT call and to my surprise I was selected. YAY!! You can't tell how excited I am. Thank you, Svetlana for giving me this wonderful opportunity. Looking forward to working with you and with your beautiful designs. 

Mean while you can enjoy their beautiful stamp designs HERE :)

May 6, 2017

No Line Water Coloring with Catherine Pooler Inks | Video


Water-coloring is becoming one of my favourite techniques! In my last week's post I mentioned that I wanted to be a water color artist. Since then I just kept trying and I'm not saying that I am pretty perfect at this moment. You can point out many mistakes but I just love the result and I wanna keep trying :)


CARD DETAILS

As soon as I got my inks from Catherine Pooler Designs I almost tried out all the techniques, kind of tested it out and found that these inks are not only juicy and vibrant but also very versatile.
  • When stamped it gives a solid and non splotchy image (ex: here)
  • Gives a perfect ink blended background (here)
  • Great for ink smooshing (here)
  • Can do water coloring also 

I started stamping a few floral images from Beautiful You stamp set on Timholtz water color paper with Antique Linen Distress Ink. I didn't mask any of my images just nested the flowers by turning the images in different angles. I smooshed Flirty Fuchsia, Party Dress, Rockin Red and Lime Rickey inks on a DIY palette and water colored the flowers with a paint brush.


I just love the result. As always I added splatters of black paint to enhance the beauty of the design. I struggled a bit on where the sentiment should go but I decided to stamp on the center of the flower. I outlined the sentiment with Gold Calligraphy Marker to stand against the bright bold background. Finally added Wink of Stella clear for the images.

I have made a video for you and I hope you'll enjoy watching it. :) Thanks for visiting. See you soon!

May 5, 2017

Moped Bigz Die | Sizzix


Hello everyone! How are you? My nieces are here so I really have a very less time to craft and think about ideas. But somehow I squeezed in a little time and created this cute card with Moped Bigz Die from Sizzix UK. I love creating all cute stuff but sometimes I think and come out of my comfort zone and create cards with different styles. But cute stuff with happy and bright colors are always close to my heart. :)


CARD DETAILS

This Moped Bigz Die was designed by Debi Potter and it die-cuts 9 pieces but you need to die-cut the wheels and lights twice. This Moped was too big for my card so I decided to adhere half portion on the card front and the remaining on the inside of the card!


I die-cut all the pieces by running the card stock and die through the Big Shot Express machine and distress colored with Festive Berries, Peacock Feathers, Black Soot and Mustard Seed distress inks. Once the pigment dries, I adhered all the pieces with Tombow Glue

Here's how the Moped looks like!

I took a white card base, masked the edges and ink blended the background with Black Soot Distress Ink. Then added splatters of water with a paint brush and blotted the excess with a tissue paper. This creates some magical effect to the background. Then adhered the Moped on the front of the card with a few hearts and stamped the sentiment from Technique Tuesday. I think the sentiment matches perfectly to this cute little card.


On the inside of the card, I masked the lower portion and blended with Black Soot Distress Ink, also added splatters of water. And finally added the remaining half portion on the inside of the card with a few punched hearts! :)


And that's it. I hope you like the card. Thank you so much for stopping by. See you soon :)


BE INSPIRED WEDDING

Sizzix Uk has launched their May campaign which is Wedding inspiration. They also have some free papers to download for this campaign. You can learn more details HERE